
Set up an AI Agent role in quickS3
Create a dedicated role for your AI agent, assign it to yourself, and delegate it to Claude Code or Codex. Plus why an owner can't hand over the Owner role.
When you connect Claude Code or Codex to quickS3, the agent doesn’t get an account or permissions of its own. It borrows yours, but only through the roles you pick on the consent page. That catches a lot of owners out: the consent page has nothing to offer them until they create a role for the agent and give it to themselves.
This guide explains why, and walks through the setup. It takes about five minutes.
Why your Owner role isn’t enough
quickS3 has two kinds of roles:
- Owner and Admin are organization roles. They’re for running the organization: inviting people, editing roles, managing storage connections. As an owner you can also browse every bucket in the web app, which is why the People page shows Full access next to your name.
- Custom roles, the ones you create on the Roles page, are data-access roles. Each one is a list of allow and deny rules on a connection, a bucket, and optionally a folder.
An AI agent can only use custom roles. Owner and Admin can never be delegated: they don’t appear on the consent page, and quickS3 ignores them when an agent calls a tool. That’s deliberate. An agent that uploads a build or fetches a report doesn’t need to manage your team or reach every bucket you own, and a leaked agent token shouldn’t be able to either.
So the setup has three steps:
- Create a custom role that grants exactly what the agent needs.
- Assign that role to yourself, in addition to Owner.
- Pick that role on the consent page when you connect the agent.
Step 1: Create the AI Agent role
You need to be an owner or admin for this step.
- Open Roles and click Create role.
- Under Start from, pick a template. Start empty lets you write every rule yourself. Uploader starts with write access to one bucket or folder you choose next. Avoid Full access for an agent unless you really mean every bucket on every connection.
- Enter a Role name such as
AI Agent, and a Description like “What Claude Code and Codex may touch”. Click Create role. - In the role’s Rules, click Add rule once for each place the agent should reach, and fill in:
- Effect: Allow
- Connection and Bucket: the storage it may use
- Prefix: a folder such as
reports/, or leave it empty for the whole bucket - Read, Write, or both
- Click Save role.
Here’s what a sensible agent role might look like:
| Effect | Connection | Bucket | Prefix | Read | Write |
|---|---|---|---|---|---|
| Allow | R2 production | public | Whole bucket | ✓ | ✓ |
| Allow | Wasabi archive | exports | reports/ | ✓ | |
| Deny | Wasabi archive | exports | reports/payroll/ | ✓ | ✓ |
The agent can publish files to the public bucket and read reports, but it can’t open the payroll folder. Nothing else in your storage is visible to it.
Your deny rules always follow your agents. An agent can only use the allow rules from the roles you delegate to it, but the deny rules from all of your roles still apply. If another of your roles blocks a folder, your agent can’t open it either, even if the AI Agent role allows it. You can’t give an agent access you don’t have.
Step 2: Assign the role to yourself
- Open People.
- Find your own row and open the roles menu next to your name. As an owner, it reads Owner.
- Tick AI Agent. Leave Owner ticked: you’re adding a role, not swapping one.
Your Access column still reads Full access, because Owner already covers everything in the web app. The new role changes nothing for you. It’s there so you have something to hand to an agent.
The same works for teammates. An owner or admin creates the role and assigns it to a teammate, and the teammate then delegates it to their own agent. Each person approves their own agents, and every agent action is tied to the person who approved it.
Step 3: Delegate the role to your agent
Connect your agent as described in Connect Claude Code to your S3 buckets or Connect Codex to your S3 buckets. When the consent page opens, Roles to delegate now lists AI Agent with a summary of its rules.
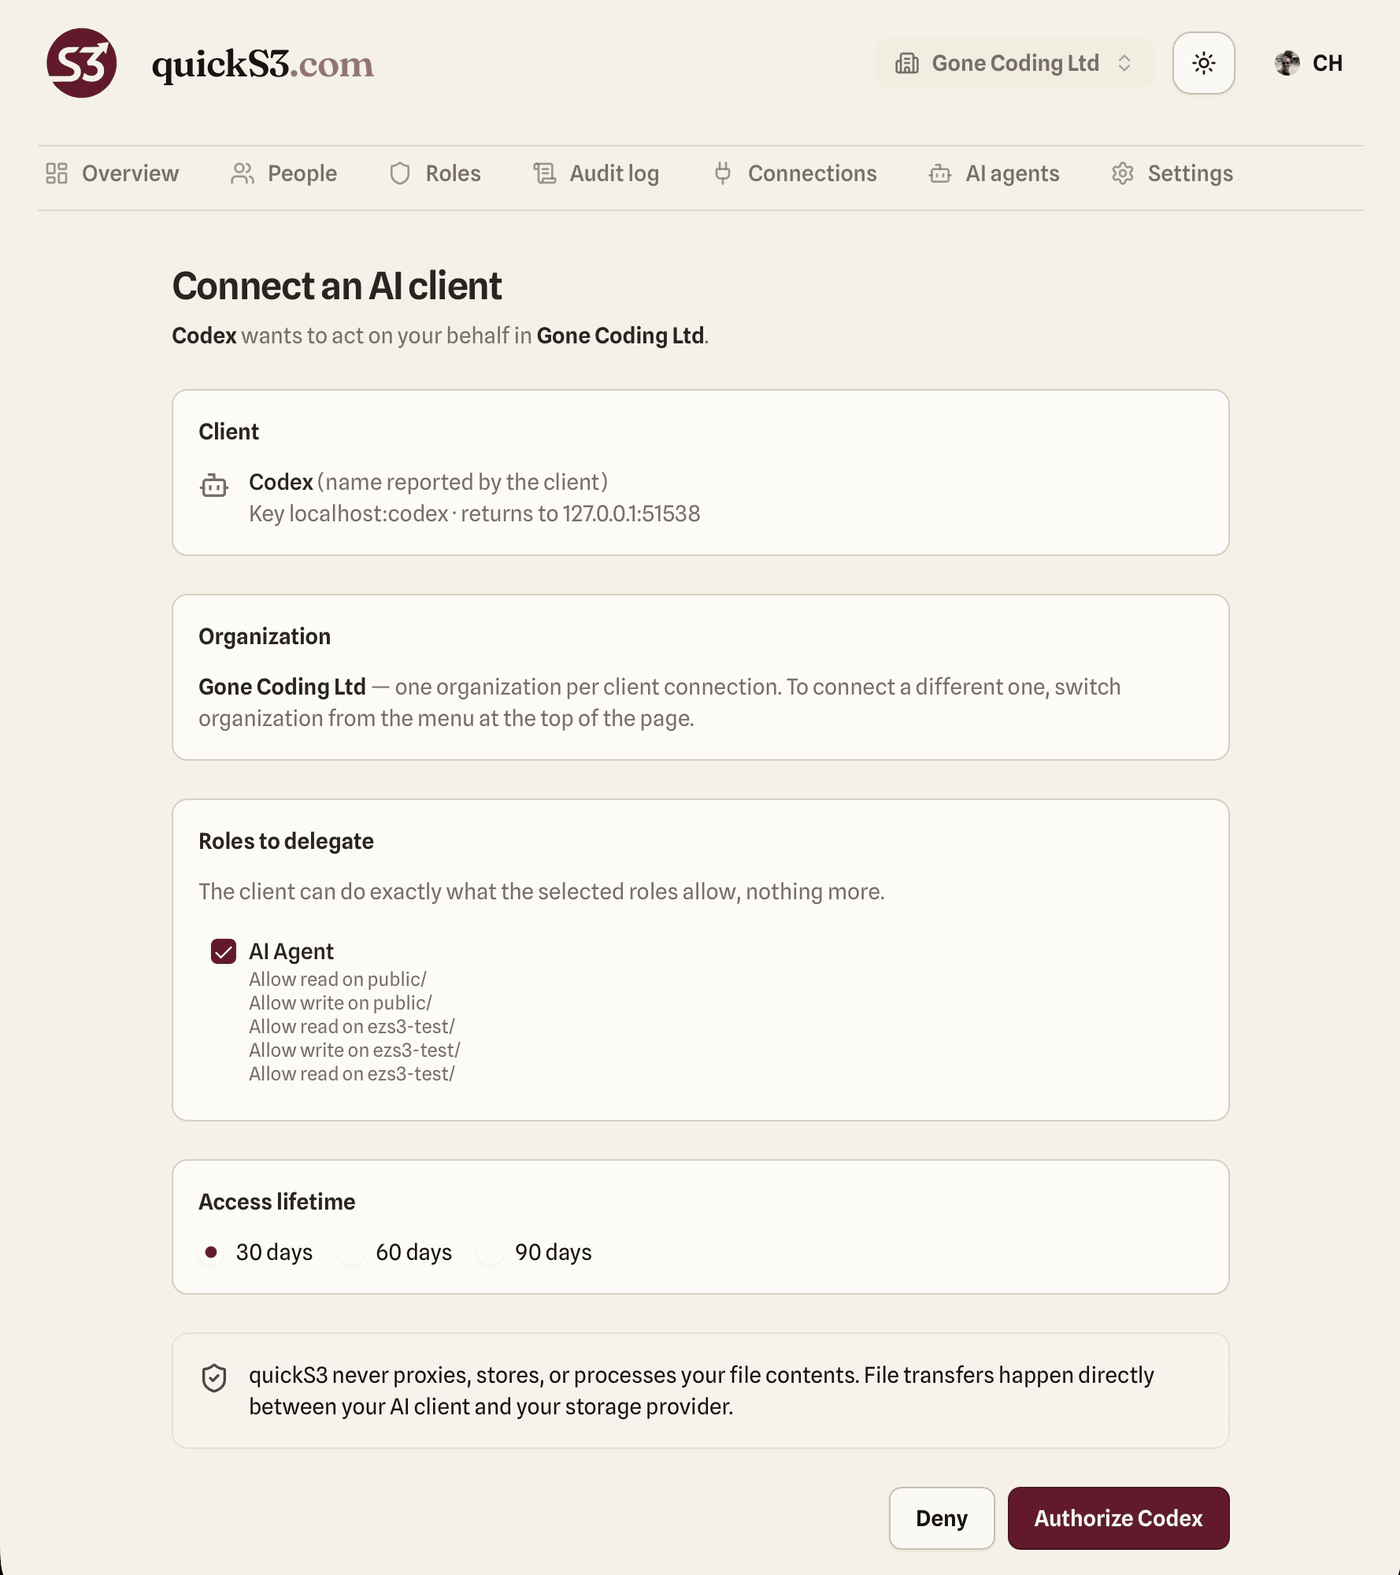
Every role you can delegate is ticked by default, so untick any the agent shouldn’t have. Owner and Admin never appear here. Pick an Access lifetime and click Authorize.
If the consent page shows no roles
If you see this under Roles to delegate:
You have no data-access roles in this organization. An owner must create one and assign it to you before you can connect an AI client.
then you only hold Owner or Admin, or no role at all. Go back to Steps 1 and 2. Connection requests expire after 10 minutes, so start the connection again from your AI client once the role is assigned.
Changing what the agent can do later
quickS3 checks the agent’s access on every tool call, against the role as it is right now:
- Edit the role’s rules and the agent picks up the change on its next call. You don’t need to reconnect it.
- Untick the role from yourself on the People page and the agent loses that role’s access immediately, even though its grant is still active.
- Revoke the grant on the AI agents page and the agent is cut off, including its refresh tokens.
- Leave the organization, or get removed, and all your agents stop working too.
- Do nothing and the grant expires after the 30, 60, or 90 days you picked.
One shared AI Agent role for the whole team is handy for this reason: tighten it once and every agent that uses it follows.
Checklist
- A custom role with explicit allow rules for the agent
- Any deny rules the agent must respect, inside that same role
- That role assigned to you, in addition to Owner
- That role ticked on the consent page
Want the full picture first? See how the quickS3 S3 MCP server handles credentials, transfers, and audit. New to quickS3? Sign up, connect a bucket, and set up your first agent role.
For maintained role and consent guidance, use Prepare an agent role.
Read next

Connect Claude Code to your S3 buckets with quickS3
Add the quickS3 plugin to Claude and Claude Code, choose which roles it may use, and let your AI agent browse, upload, and download files in your S3 buckets.

Connect Codex to your S3 buckets with quickS3
Install the quickS3 plugin in Codex, choose which roles it may use, and let your AI agent browse, upload, and download files in your S3 buckets.

How to give someone access to your S3 bucket (without IAM)
Share an S3, R2, B2, Wasabi, or Spaces bucket with a manager, vendor, or client: invite them by email, limit them to a folder, and see what they do.